Photoshop is not initially set up for photographers to get the best out of it. It is set up for graphic designers. In order for said photographer to get the best out of it there are a few tweaks you can do straight away.
Photoshop Set-Up
1.) Go to adjustments > Curves
Options > clip 0% and set as default
*Enhance monochromatic contrast and set as default
This will then be curves auto setting and levels every time you open up Photoshop
The colour space for internet use is sRGB
The colour space best for printing (e.g. magazines) is AdobeRGB
Adjust accordingly when working on different images for use with different mediums.
There is one more space - ProPhoto - huge colour space created by Kodak. For now LEAVE ALONE.
2.) Edit > Colour Settings
Working space - Adobe RGB (can export in lightoom)
- sRGB (for internet use)
Tick all boxes in colour settings
*All set to preserve embedded profile*
3.) Edit Preferences
To work out your screen res - measure the screen and then right click desktop and look at screen res and divide it to get your resolution.
Windows machines use 72 ppi and Apple use 96 ppi.
Monday, 30 January 2012
Zoetrope - Digital Idea
For my Zoetrope I have decided to be daring and try a digital one. I like the idea of taking a scene in real life and then manipulating it using the zoetrope effect.
A advertising board on the roadside will form the background for my scene. Using photoshop I shall replace the image on the board with a plain white background. I shall then shoot approx 25-30 images of someone walking towards the camera.
The camera will be stationary on a tripod and the person will walk towards it, every time they move closer I will press the shutter to capture there movement. As they come in for their close-up they shall re-enact the Edvard Munch scream pose.
I shall set up my camera on a tripod and take approx 25-30 shots on the advertising board and the street below to also give that part of my zoetrope movement. So in effect I shall be layering two images onto one and creating a gif file using both the street scene/advertising board and the Edvard Munch images.
Not the greatest of drawings but a rough (very) outline of my idea.
Inspiration came in no small part to the video shown to us in our IDE module class by Olympus cameras. Showcasing their new Pen camera Olympus used stop motion bringing huge billboards to life. See below for the fantastic video:
Monday, 16 January 2012
Zoetrope - GIF creation
Zoetrope.....what is it? Well the Zoetrope I am referring to is not Francis Ford Copploa's and George Lucas production company but it is in fact a device for giving an illusion of motion. The first Zoetrope's consisted of a slitted drum (see fig 1) that when spun round the images placed inside become one and gave the illusion of movement.
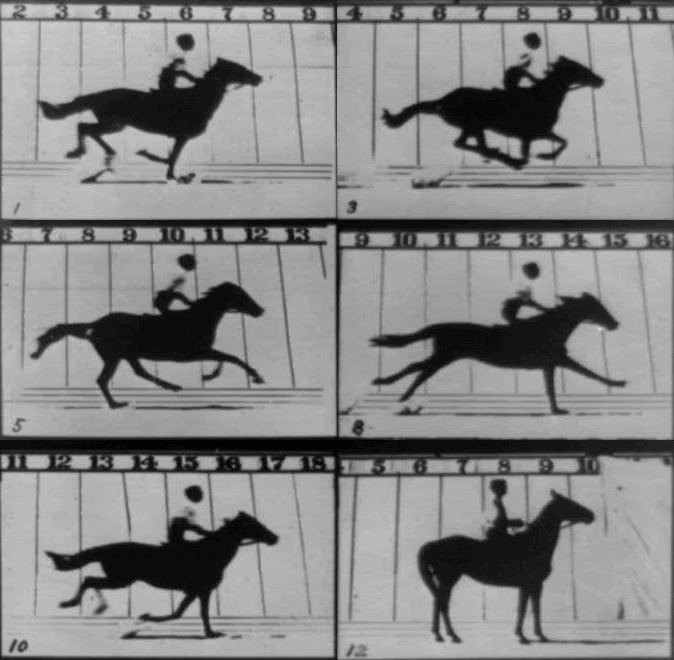
Using the famous set of horse photographs taken by Eadweard Muybridge we created our own digital style zoetrope by using the Muybridge images and turning them into a GIF file. Muybridge proved, through a series of motion images of horses,that all four of a horse's hoves left the ground at the same time.
A GIF file is an images that is predominantly used for presenting graphics on websites. GIF files can be animated hence the reason for using this format to make a digital zoetrope.
How to make a GIF
Open up photoshop
Edit - cut
Create one new file
Paste cut out image
Then repeat
Go to window animation
Got to top right - make frames from layers
Select all frames
Hold shift and click on end
Change frame rate
File save for 'web & devices',select GIF (on right)
Voila!

Monday, 9 January 2012
Mid-Point Evaluation - Book Cover
IDE Mid-Point Evaluation
Sam Johnson
Book Cover Design
THE TALE:
Red Riding Hood by the Brothers Grimm / ‘Petit Chaperon Rouge'
I was due to shoot a model (sourced off a model website) before Christmas but the shoot was cancelled. It has since been re arranged for the 14th January. Hopefully as it’s an outside shoot the weather will hold off and I can get the shot underneath the railway bridge that I am looking for.
I have also sourced a women’s trench coat for the shoot and have got hold of a black leather briefcase which I shall use for the back of the book image of the wolf’s head placed in the case. I did initially decide to shot the image of the briefcase with the wolf’s head inside in the studio however I have now decided not to. The reason being I want the overall feel and concept of the front cover to marry perfectly with the whole dust jacket. I have decided that the image on the back may be a little too jarring and subsequently change the 40’s espionage tone I am aiming to achieve with the front cover. My idea for the shot now is to have the model hold the case open revealing the head inside shot on the same background as the front cover image (i.e. near to the railway bridge).
I have taken some test shots of the location from different angles so I know how to position my model on the day of the shoot. I have also edited the images using light room and Photoshop playing around with ramping up the shadows and contrast with layers and converting to black and white. I will also use subtle selective colouring on the models red gloves and red hair on the final image.
I aim to have both the front and back cover images finished for the end of January when I will spend the remaining time editing them and making sure they fit the size format of book I have gone for. The total size including both front and back flap will be 62.5 cm x 24.2cm. This will fit perfectly round my chosen book. I will shoot both portrait and landscape on the day and decide in post-production which looks the most effective.
Zoetrope:
Unfortunately I was unable to attend the Zoetrope photo session in the studio but I have come to the conclusion that I shall shoot my own images and create a digital Zoetrope. Partly inspired by the Olympus pen video shown in class, my idea is to shoot a number of images (20-30) of movement and then layer them on top of other images I would have shot previously of an advertising boarding. The idea is to create movement on the advertising boarding so it looks like its alive. I will achieve this using Photoshop layering and creating a GIF file.
Subscribe to:
Comments (Atom)


